Friday, 11 May 2012

Office Work

I wish I could sit and create all day but in order to sell my work there is a certain amount of office work I need to do. I usually do the office work if the weather is so bad like this week cold and very very wet or it just needs doing.
So what does my office work consist of, well mainly it is taking photos of jewellery, beads, elves etc. then uploading them to the computer to edit them. Some get uploaded to Flickr, posted to forums and used for selling like in my ETSY listings which then I pin to my Pinterest boards
Blogging is part of my office work as it is part of my self promotion getting my name out there so people get to know me and what I do. That also means I have to update my Facebook page and of course Tweet.


I also have a side where I want to help out others, like recently I made my first Squidoo lens on Jewellery Parties, I could have written it on here I know but I thought I would give it a try. I hope to add to that lens with a few more hopefully about display, craft fairs, etc. I include going on to the forums I'm a member of as part of my office work, well it is a bit lonely working for yourself and going on the forums helps.

Office work doesn't just include the above its the accounts as well, and possible my favorite part, ordering. Yes ordering glass, beads, metal and elf bodies is all part of the office work. So for now I had better get on and update my other blog and order some glass and go and chat to some lovely crafters on my favorite forums. 

Monday, 23 April 2012

Giveaway Winner

Thank you everyone who took the time to leave great comments. The Elves will continue as they are perhaps not so many plain ones.

So to the bit you are all waiting for, yesterday evening I put all the names in a bowl and blindfolded   the girlie and she picked out ...........................

                        Awrylemming


Congratulations and the Elf and Bead will be in the post to you. 

Tuesday, 17 April 2012

Beach Huts to a Street.

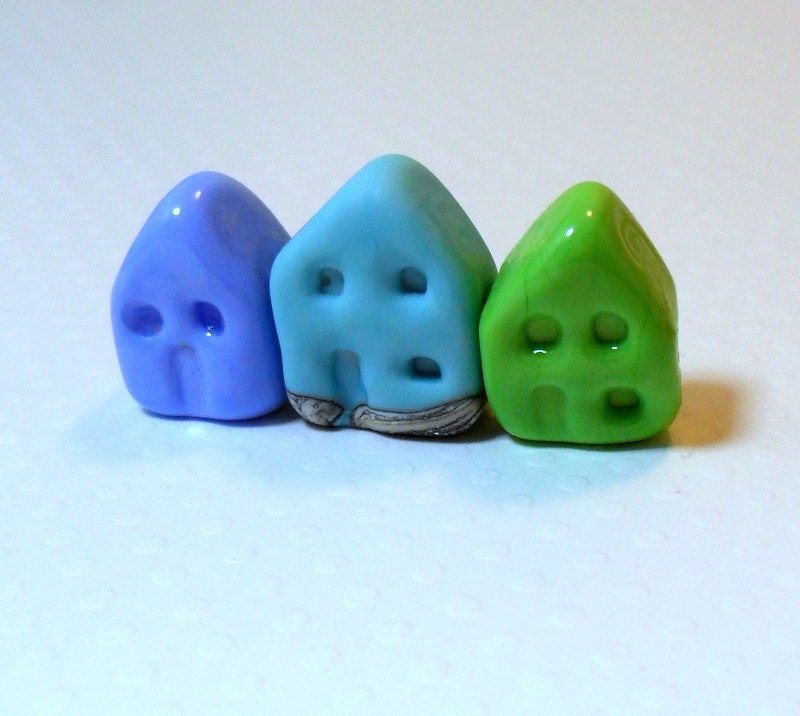
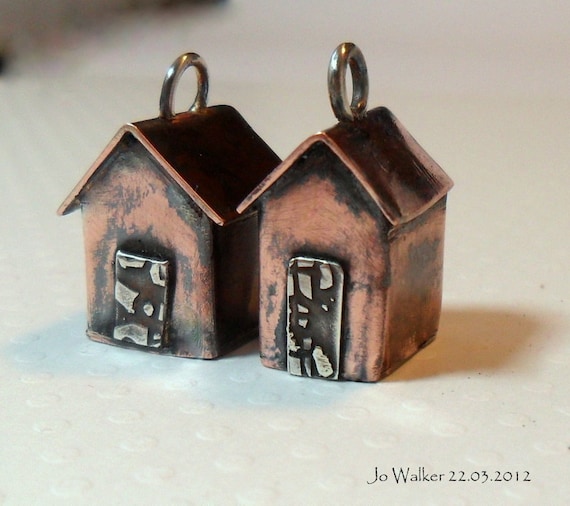
The creative process is a fun one, anything can spark it, a word, music, colour, photos, the list is endless. I have been fascinated by Jo Walker, a fellow Craft Pimp Forum member and part of the forum team on ETSY, and how she has been inspired to make the lovely creations below.

First she was inspired by beach huts to make these lovely and original lampwork beads.


But it didn't stop there, Jo created these beauties in copper & silver.


Then a street developed, including a castle.


Well I just had to treat myself so I'm the proud owner of one of Jo's houses. It has been interesting seeing the creative development from making the lampwork beach huts to the houses. I'm looking forward to see what type of house she will make next. 


Have a look at her shop on ETSY to see more.


Thursday, 5 April 2012

Its a giveaway

Yes I have decided to have a giveaway on the blog, now you have to do a little work for me, don't worry its nothing to bad just need a little marketing advice.
As you may know I make cute little Elves and some of those are in my ETSY shop, I love making them but I really want to concentrate on making limited edition ones a bit like these.


So my Question is: Should I keep making the Elves and just Limited Editions?

So for the chance to win an Elf and one of my Lampwork beads just leave a comment below, you have until Sunday 22nd April 2012 and I'll put all the names in a hat and announce the lucky winner on Monday 23rd. 

This is what you could win.
 

Good Luck. xxx


Sorry

Well I was supposed to be keeping up with this blog, eek slapped wrist for me. Anyway I set up a Twitterfeed last night and I was a bit tired and ended up with all the posts tweeted. Never mind it was fun rereading a few posts. I've added a widget to the blog so you can see my tweets and there is a link if you want to follow me.

So the next post is the important one, so make sure you look you could win something from me.

Wednesday, 25 January 2012

Book Binding Tutorial

As you may have read on an earlier post I mentioned my new craft Book Binding. I made this fabric covered book as a gift for a friend.


I was trying to find a tutorial for it but I couldn't really find anything close to how I made this one, so I have written my own. This is my first Tutorial so I hope I cover everything clearly.

Materials:
A5 thick card i.e. grey board / mount board, I used Tim Holtz grunge board.
Fabric, if the fabric is thin I would interface it, and ensure you have about a cm all round to glue inside for neat edges.
Ribbon
Paper
Inside cover paper or card
Thread, ordinary thread is fine just check you can pull it without it snapping or if wrapped round a finger it will cut of the blood supply, which means it will be strong enough.
Glue, Fabric & PVA.
Ruler
Pencil & Eraser
Sharp Knife
Bone / Paper folder
Needle 
Awl 


How to make the book.

First you will need to cut the spine and the covers from the A5 thick card. The spine I cut measured  2.5 cm wide x 12.5 cm tall, measure this onto the card with a pencil and then cut with the sharp knife. You can then cut the rest of the card in half for the covers or measure and cut. My covers when cut measured 9 cm wide x 12.5 cm tall.

Next spread fabric glue onto the card and place onto the fabric I left a small gap of a few mm between the spine card and covers. If the fabric is thin the glue may come through the fabric it can be gently sponged off when dry but interfacing the fabric may prevent this and also give some strength to the cover. Spread glue on the inside edges of the card and fold the fabric onto the inside, you could cut the corners at a diagonal to get neat corners or glue in on the diagonal first. Turn over to ensure the cover of the book is smooth, if not turn back over and lift up the glued fabric and pull to smooth out the front. Leave to dry.

While the cover is drying it is time to cut the inside cover paper and the paper for the individual booklets. To get the measurement needed I measured the width of the book and the whole length, I then adjusted this to show the fabric around the edges. 
Cut the paper for the inside cover, mine measured 12 wide/ tall x 20 cm in length.
Next get the paper for the booklets and decided how many pages you will need and how many booklets.  I cut 10 sheets for each booklet so when folded that would give 20 sheets per booklet and had a total of 6 booklets.
Measure out on the paper the width / height of the booklet, I kept the same as the inside cover which was 12 cm, and cut out. 
After cutting all the sheets you need for each booklet fold then in half using the bone / paper folder to give a sharp fold. 
Now you will need to cut the booklets to fit in the cover, I leave this until they have been folded so that all the edges are the same length. Mine measured 8.5 cm.

Now you need to attach the ribbon to the cover, measure how far down and in you would like the ribbon, and make a mark. Measure the width of the ribbon and draw a pencil line on the mark the width of the ribbon. Now cut the mark with the sharp knife through the card, turn the card over and neaten the cut through the fabric. Push the ribbon through the hole, it might need a push through, and attach it to the inside with glue, I also use some tape to cover the ribbon to be more secure. Cut the ribbon to the length you require.
Now cover the inside cover paper with glue and place on the card, to complete the cover and leave to dry.


Nearly there. You will need to measure the holes for sewing in the booklets, I made about 4 holes, you can make more or less. Mark this on the spine and them mark holes for all you booklets. Use an off cut of paper the size of your booklets and mark on to this the hole marks. Then use this as a template to mark the holes in the centre pages of the booklets.
Use the awl and make holes in the spine, and through the booklets. 
Thread the needle with an length of thread and sew through the booklet and spine (leave a tail of thread for knotting later). Sew through as may times as you want, I did it twice. Knot the thread together, I used a surgeons knot and cut the thread neat. If you can hide the knot in the holes. Sew in the other booklets in the same way. 
If you find the corners of the cover have curled a bit but the completed book under a heavy weight if needed.

And there you have a completed book.

Wednesday, 4 January 2012

Blogs and Goals

I have been meaning to recommend a blog to you all, it is written by a local lady who is a writer.
muddy lobster  I love it.

So New Year Resolutions do you make them and then end up breaking them, I used to so I don't make them any more. What I do instead is set myself goals for the year, most of those I set last year I achieved, there are a couple I didn't complete but I made progress on them. I heard someone mention on the radio yesterday about one resolution to loose weight, you expect to loose that weight straight away and you get fed up and then you've broken that resolution. That is a good example where a goal is more attainable. My children have to make resolutions at school and they we struggling so I made up one for them, "No more resolutions to break, but goals that I can make" I expect they won't use it at school but it did make them think.
I haven't set my goals for the year yet but I will do soon, right of to get some mood / inspiration boards up for well inspiration.