Thursday, 12 February 2015

Oops I missed a week

I forgot to add my make for week 5 of the year long challenge to the last post so here it is now. I finally made my needlecase.

Patchwork Needle Case front

This is the front with some of my vintage pearl buttons, I made it in a patchwork style with some batting and lined the inside with some of my favourite taffeta from my fabric stash.

Patchwork Needle Case inside

I used some white muslin for the leaves of the case and as you can see I've already filled it up with my sharps and my darning needles I use for my doll making.

Patchwork Needle Case back

I also trimmed the front and back with ribbons, I did have to resew it as it had gone a bit wonky. I also did some top stitching around the edge to neaten it a bit more. 
Its now in my doll sewing box and I love using it.

see you soon
Vic xx

Wednesday, 11 February 2015

New Angel dolls.

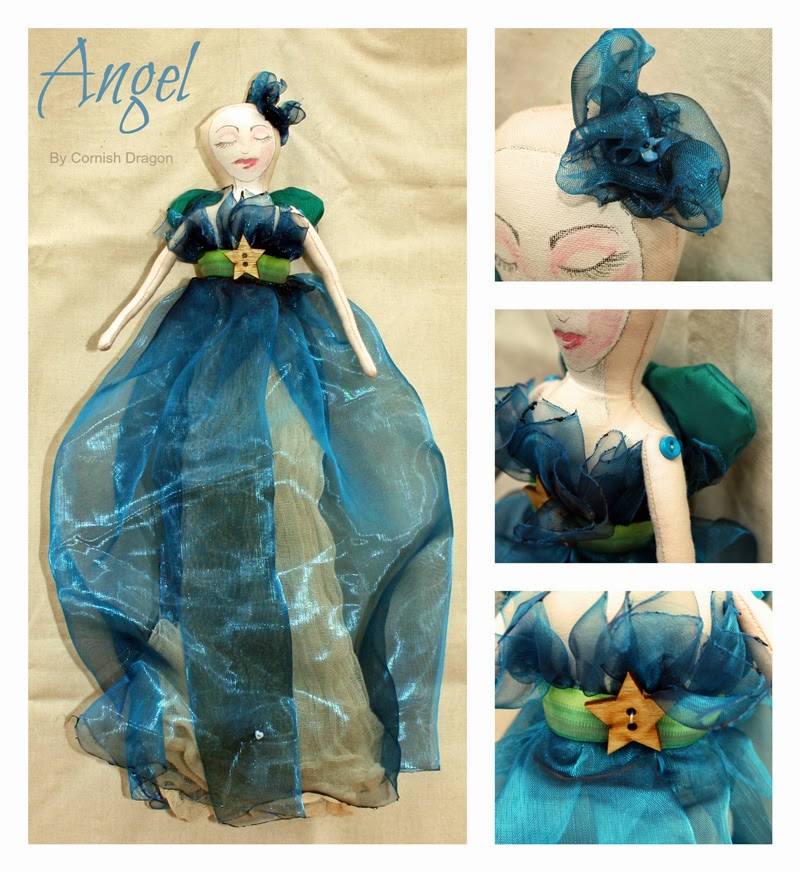
These dolls are my make for week 6 of the year long challenge, they aren't my usual style of dolls and I did enjoy making them. I used a pattern by Cindee Moyer and adapted it to my style of working and I'm pleased with the results.

cloth art angel dolls

I made three in total all different colours, Blue, Pink and Purple. They were quick to make and fun and they look great.

Cloth Art Angel Doll

I like the organza over the cotton muslin and scrim which I feel gives them an more ethereal feel along with the the closed eyes I painted they look very serene. 

Cloth Art Angel doll

They are in my Etsy shop along with all my other available dolls. I think I may make more of these but first I need to order some more doll fabric. 
I wonder what I will make for week 7.

See you soon
Vic xx


Monday, 26 January 2015

The Making of Ms.Red Riding Hood

For week four of the year long challenge I decided I would make a doll that had been in my head for a while. Well as you can guess from the title of this post I was making Red Riding Hood, she took about three - four days to make in total. I also had to draft my own pattern for a part of her clothing, which took a bit of head scratching.
As always I showed the progress on my Facebook page with some Work In Progress Photos, which for the first time I'm also sharing here.
As always I start with the head which after sewing needed to be stuffed, needle sculpted and then my favorite part drawing and colouring the features.  

Art doll work in progress

The next step is to stuff and attach the body parts as you can see on the photo below I've button jointed the hips and shoulders. I also took a photo of the doll on the fabrics I was thinking for using for her clothing.
Art doll work in progress


I decided to use the white cotton for an underskirt with a shell pink chiffon over the top. I then gave her a faux leather corset and finished the bodice with gold lace. 

Art doll work in progress


I also added ribbon to her wrists and tops of her boots, and I also added laces to her boots using some embroidery thread. 

Art doll work in progress


Next was the cloak the piece of clothing I had been scratching my head over, well I just went for it and I made a fully lined hooded cloak. I did make one mistake on it, while sewing the lining to the hood I sewed it on the wrong way out so I had to unpick it all and start again this time with success. 

Art doll work in progress


I was really please how she turned out especially the cloak, and she's now available in my Etsy shop and below are the photos of the completed Ms. Red Riding Hood. 


red riding hood cloth art doll

Red riding Hood art doll

Red Riding Hood Art Doll

Until next time
Vic xx


Thursday, 15 January 2015

Week 2 & 3 of 52 Things Challenge

So I finished the make for Week Two which was a sewing needle case. I felt I cheated a bit as I used a free kit off the front of this months Mollie Makes Magazine. It was easy to make and it was nice to do some patchwork which I haven't done since I left school. The only thing was some of the instructions I disagreed with, for instance the hexies they suggested whip stitching together this left stitches showing and looked messy to me.  I sewed them together and attached them to the felt with a Ladder Stitch which I use all the time with my dolls as it gives a near invisible join and looks a lot neater.

patchwork sewing needle case

I also stab stitched the pink felt onto the rest of the case rather than the suggested running stitch, I did want to blanket stitch it on but I couldn't remember how. I've given this to girlie for her sewing stash as its just a bit too bright for me, I will make a needle case for myself at some point during this challenge. 

Steampunk cornish pixie elves

So for Week Three I painted some bigger Steampunk Elves to go with the tiny ones I made before christmas. I separated them into two sets and they are available in my Etsy Shop I wish I still had some cogs as I could have sewn them to the hats. 

steampunk cornish pixie elves

I also painted two other Pixie elves especially for valentines, but they could be for all year round. 

love cornish pixie elves

cornish pixie elf

I wonder what I will be making for week 4.

Until next time
Vic xx


Thursday, 8 January 2015

52 Things Challenge and Gnomes

Here we are a shiny brand New Year and as usual I'm taking my time to get back into the swing of things. Luckily I have some motivation in the form of my fellow crafty pals on the Craft Pimp Forum. We are having a year long inspiration challenge which means making / creating once a week so by the end of the year you have 52 things you have sketched, made, baked etc. I've joined in and I'm not sure if I can manage it all year but I will have a good try. Luckily I had an idea already in my head for week one.

felt viking brooches

I've wanted to add some more fairytale characters to my work and shop and also a bit more affordable.  So I thought why not Gnomes made from felt and made into brooches. I sketched a few ideas and decided to make the most complicated ones first which were the Viking Gnomes Ragnar and Siguard.

viking gnome felt brooch

Siguard I made first and I glued and then hand sewed the felt together and I was really pleased in how he turned out. Next was Ragnar and he turned out very well. In fact the girlie test worked again as I nearly lost both to her. 

felt Viking gnome brooch


I listed both of them on Etsy, and I had a little giggle while writing the descriptions. I think there will be a few more Gnome brooches visiting my shop over the year including some pirates and maybe some more of the viking clan.
I wonder what I will be making next week.

See you soon.

Vic xx

Thursday, 18 December 2014

Teeny Tiny Elves

Its been a busy few weeks and I admit I've been struggling to fit everything in before Christmas. Girlie and the Lad break up from school today and I do like to just enjoy the run up the christmas with them and relax a bit.
Yesterday I had some time to do some creating and I decided to try out some of my planned designs on some very tiny elves. these elves are 4 cm tall and if it works on them it will work on the larger elves.

cornish pixie elves


So first up was three night city scene / silhouette elves. I was worried that the colours would be too dark and they are a bit, but I think it would look better on one of the taller elves.


cornish pixie elves

These Steampunk inspired two were great fun and they will work very well as part of a family set. 

I have a few more ideas to work on but I do also need to order some elf bodies in soon and I'm also wanting to make another doll or two, but that will be in the new year. 

See you soon

Vic xx


Monday, 8 December 2014

More New Dolls

Hello firstly an apology I have been a bit remiss and not blogged for a little bit, home life and getting ready for christmas has got in the way. And most importantly I have been busy making two new dolls, which I have been desperate to get out of my head as the idea for them has been sat in there a while now.
I used white satin, white and a pale blue organza for both of the dolls and then added different ribbons and extra trims. I had a change with the colourings and shadings of the face using blue and violet, with their white merino wool hair they looked very wintery and icy which is the look I was aiming for.

pearl small cloth art doll

Pearl, is one of my small art dolls and I really wanted to add the dark grey feather wings, and I had some dark grey ribbon and bows that worked well with them. 

pearl cloth art doll

The big doll I struggled with a name so I searched for viking / scandinavian names and found a couple but Astrid was the one that suited this Ice Queen Doll the best. 

icy queen art doll

One thing I knew she would need was a crown / tiara, and it was nice to be using my jewellery making skills again. I must admit I had forgotten how much wirework can  hurt the fingers.  I also got out the hot fix crystals to add a few to her skirt and also I sewed a few glass drop beads to the points.

art doll

I think if I was making her again I might have made a painted face similar to Scarlet, Cerridwen and Catalina. It certainly would have given the doll a different look but perhaps thats something to consider for another doll.  

ice queen art doll

This is my last two dolls for this year as I'm going to have a bit of a break for a few weeks. I'll be back making some new ones in the new year as there are a couple of ideas already rattling around in my head, along with a few new Pixie Elf ideas. 

Until next time

Vic xx

ice queen art doll